How do I create new users in Evergiving?
Creating and editing users
For security and PCI DSS compliance reasons, the Evergiving support team will not create new users, nor will they edit existing users, on your behalf.
The Evergiving support team only creates the initial Administrator user profile.
All further new users must be created, and edited, by an existing Admin user. Fundraisers can be created, and edited, by Admins and Campaign Managers.
Types of users
Evergiving provides several user roles, each with distinct permissions to ensure the right level of access across different operational areas:
- Admin Operations (Account > Users) - Administrative role with access to the back-office
- Fundraisers (Field > Fundraisers) - Face-to-face fundraisers with access to the pledge form
- Campaign Managers (Field > Campaign Managers) - Face-to-face campaign managers
- Agents (Callcenter > Agents) - Users and managers of the Call Center
For more details on the types of users available in Evergiving, please visit the Types of Users in Evergiving section.
Creating Admin Users
Only existing Admin users with editing permissions for the Account section can create new Admin users.
Please note that an Admin user cannot give another user more permission than they themselves have. We therefore recommend you have at least one Admin user with full rights and permissions set-up in your account.
To manage Admin Users, navigate the Evergiving left side menu by scrolling down to : Account > Users
To create a new user, click on the top right button : Add User
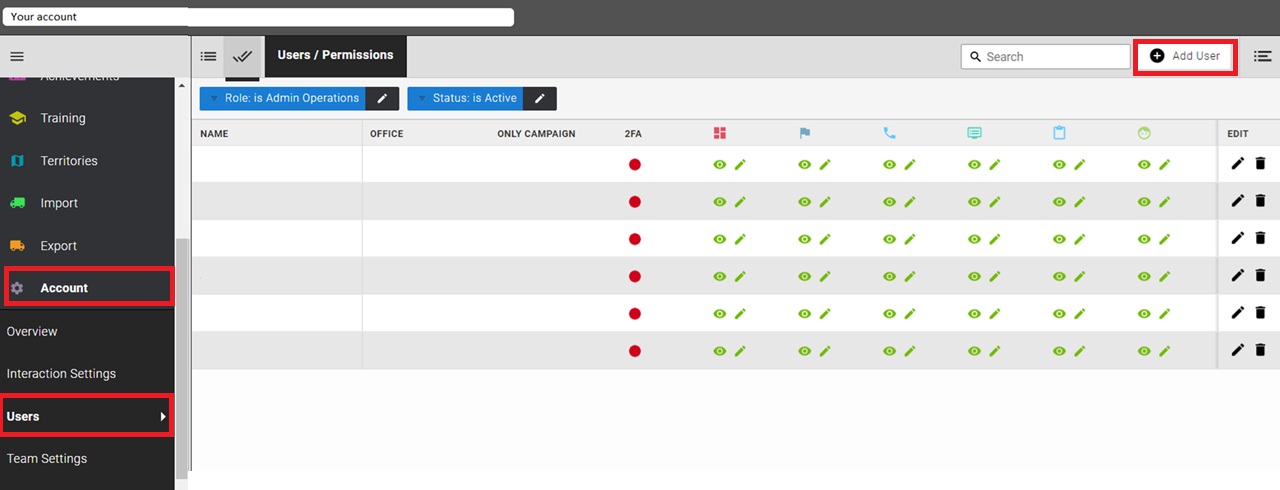
Fill-in the mandatory fields (marked with a *) :
- First and Last Name : free text fields
- Email : must be a real email the user has access to as this is the address we use to send the password reset link
- Mobile phone : if you do not wish to add a number, you can enter "1" or "0"
- Username : must be unique
- Password : password requirements can be found here
You can restrict the user to a specific office and / or to a specific campaign.
For strict security, you can restrict the user to a specific IP address by adding the allowed IP in the field "Allowed IP Addresses".
You can add an internal "User Reference" and / or an "External Reference".
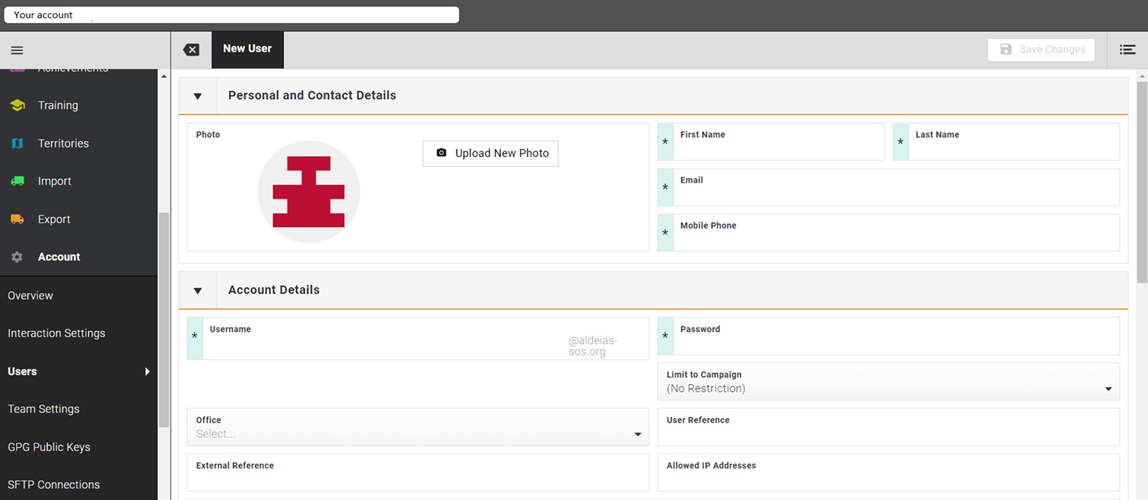
To save the profile, click on the top right button : "Save Changes". The button will stay greyed out until all mandatory fields are filled-in, you can view which fields are missing by hovering over the Save Changes button.
Then scroll down, and for each section set the level of permissions you want to give this user:
- "Disallowed" will remove the section
- "Allow read only" gives viewing permission
- "Allow viewing and editing" gives full permission

Save your changes by clicking on the top right button to create the user profile.
Editing Admin Users
Please note that the Evergiving support team will not edit users on your behalf.
To edit an existing Admin user, navigate to : Account > Users
On this page, click on the pencil icon on the right of the screen.

Edit the user profile as appropriate, save your changes.
Creating Field Users
To manage Field Users, navigate the left side menu : Field > Fundraisers or Campaign Managers
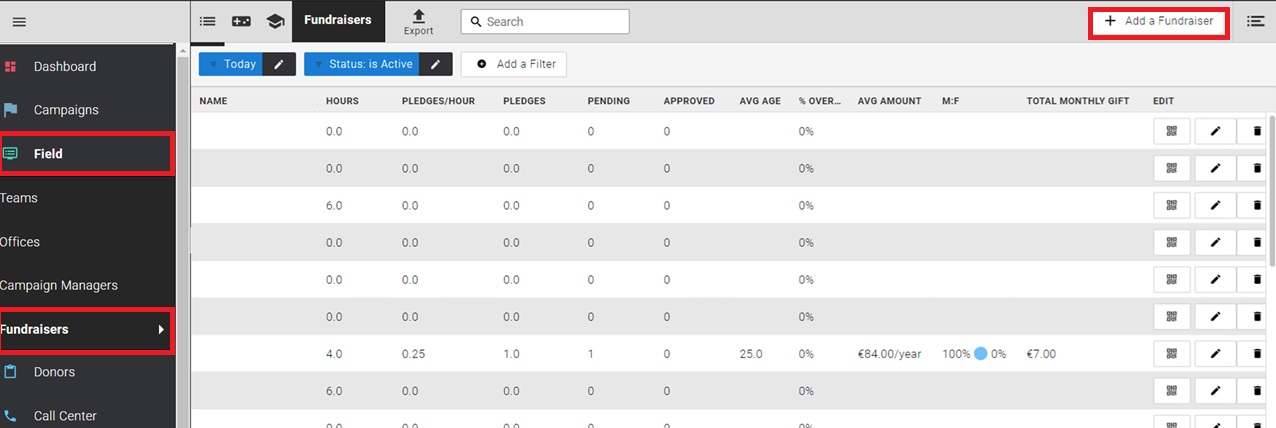
To create a new user, click on the top right button : "Add a Fundraiser" or "Add a Campaign Manager".
Fill-in the mandatory fields (marked with a *) :
- First and Last Name : free text fields
- Email : must be a real email the user has access to as this is the address we use to send the password reset link
- Mobile phone : if you want to send the credentials by SMS to the user, the mobile phone needs to be valid. If you do not have the user's mobile phone, you can enter "1" or "0".
- Username : must be unique
- Password : password requirements can be found here
You must restrict the user to a specific office.
You can restrict the user to a specific campaign.
You can add an internal "User Reference" and / or an "External Reference".
You can restrict a Fundraiser to a specific Campaign Manager - meaning this fundraisers can only be added to this Campaign Manager's teams, and only this Campaign Manager can add this Fundraiser to a team.
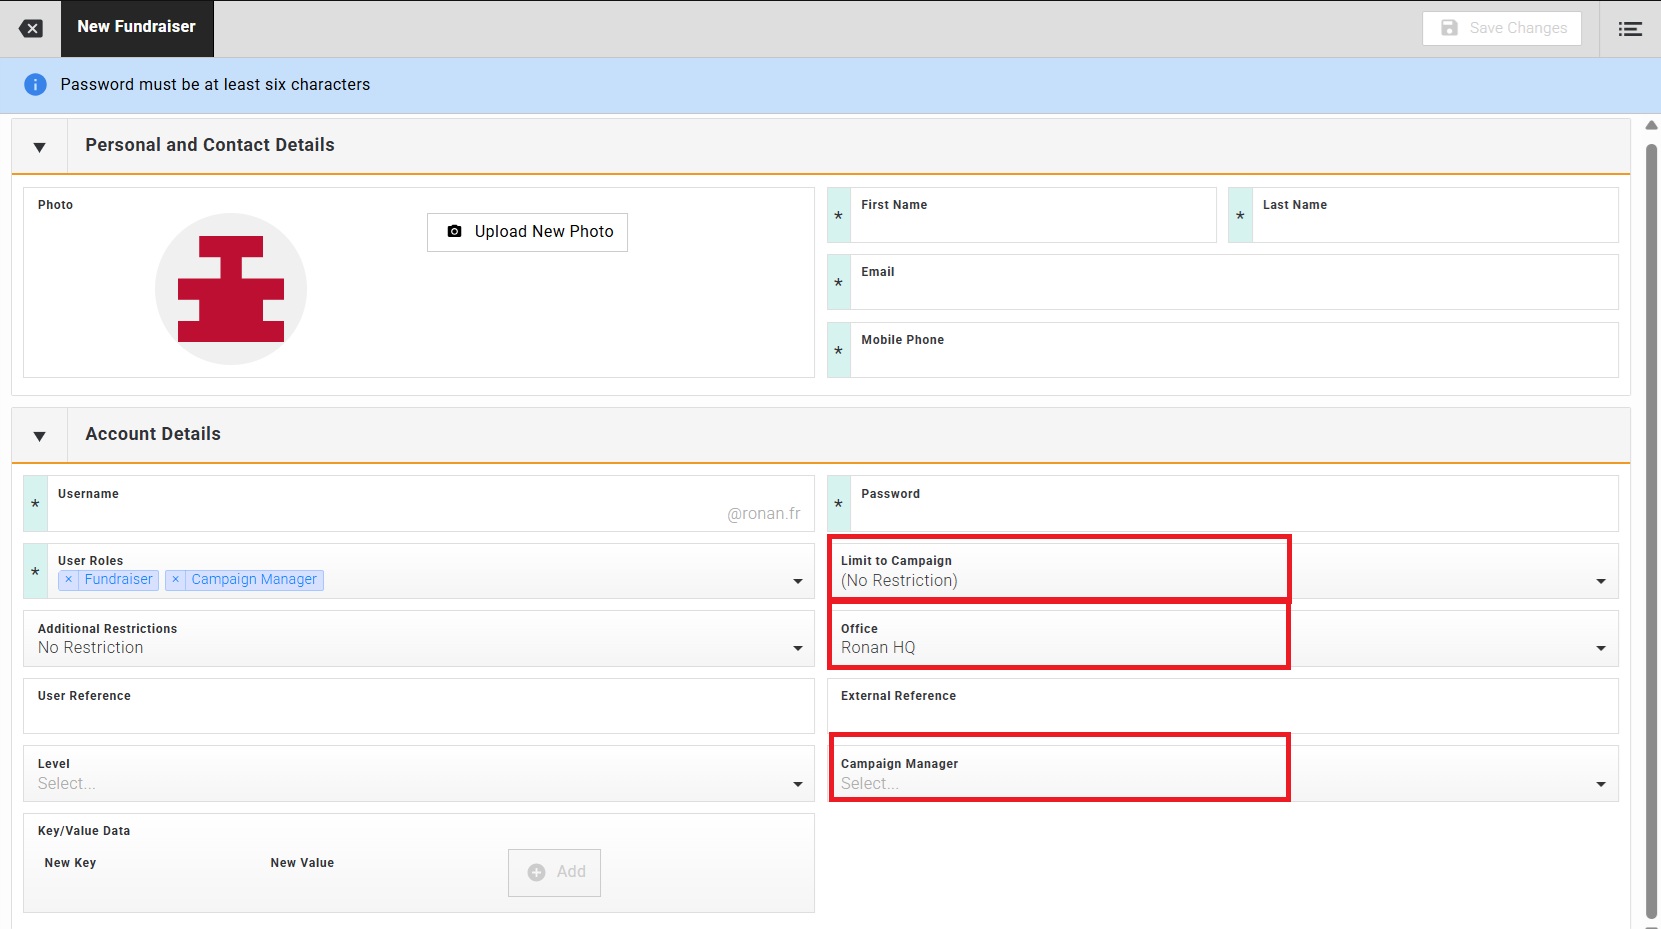
A Fundraiser can be further restricted to :
- A minimum age
- A minimum amount
- A specific payment method

If Campaign Managers have permission to view and edit the Pledges section, individual users can be restricted from editing this section.

Save your changes by clicking on the top right button to create the user profile.
Creating Agents
To manage Agents, navigate the left side menu : Call Center > Agents
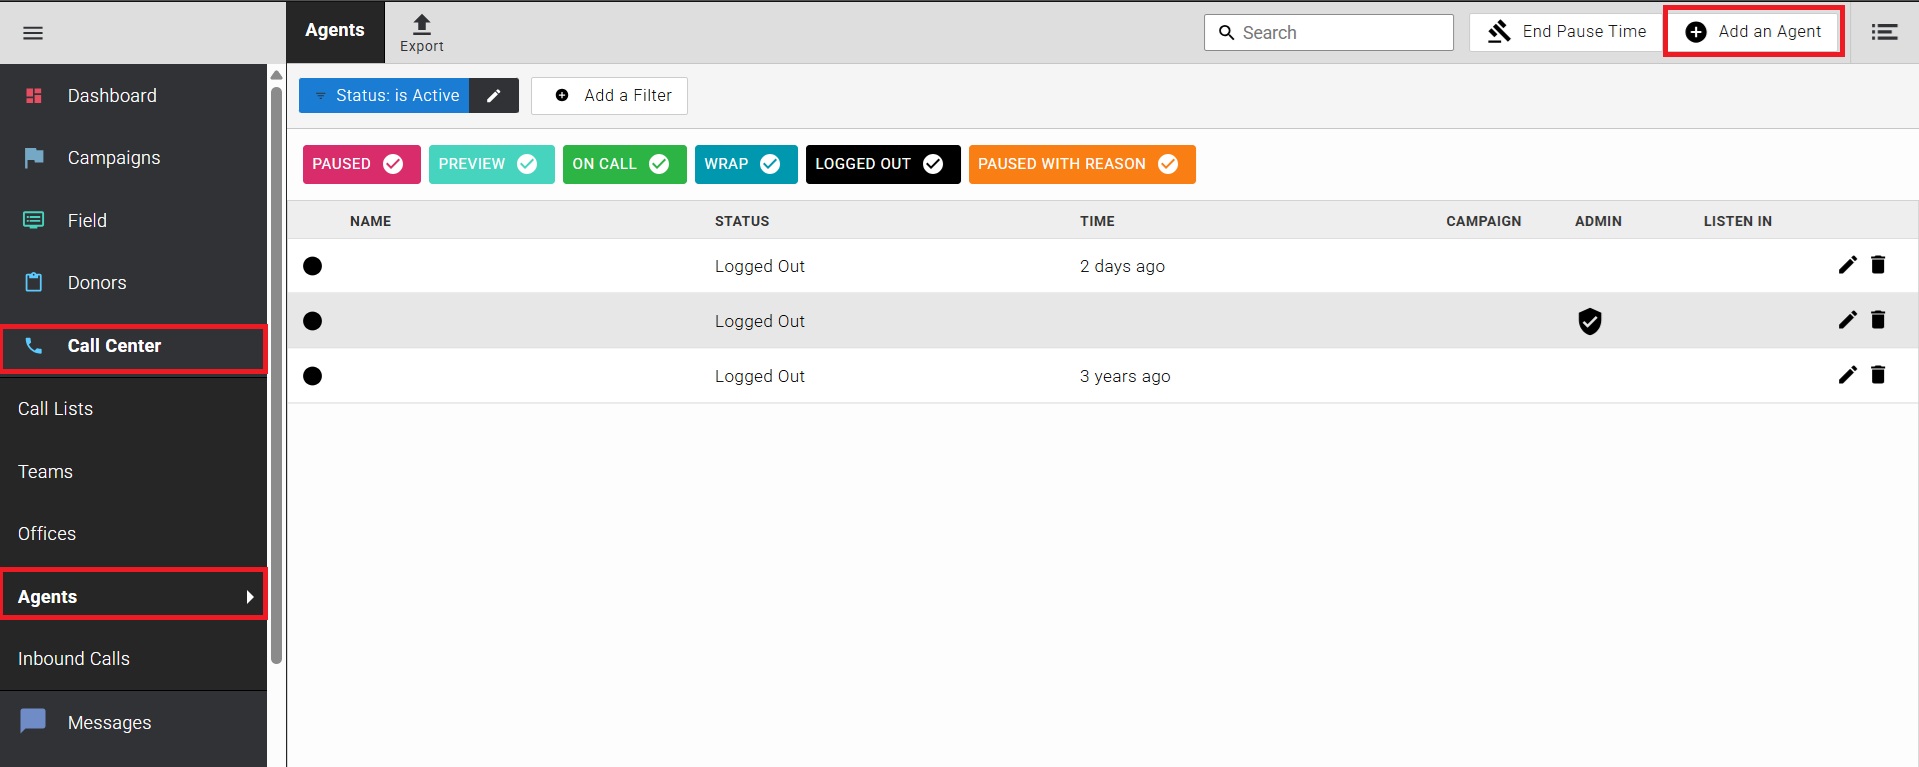
To create a new user, click on the top right button : "Add an Agent".
Fill-in the mandatory fields (marked with a *) :
- First and Last Name : free text fields
- Email : must be a real email the user has access to as this is the address we use to send the password reset link
- Mobile phone : if you do not wish to add a number, you can enter "1" or "0"
- Username : must be unique
- Password : password requirements can be found here
You can restrict the user to a specific campaign.
You can add an internal "User Reference" and / or an "External Reference".
For strict security, you can restrict the user to a specific IP address by adding the allowed IP in the field "Allowed IP Addresses".
An Agent can be further restricted to :
- A minimum age
- A minimum amount
- A specific payment method

You can grant admin rights to an agent, allowing the user to :
- Create and edit teams
- Create and edit call lists
- Manage inbound calls
To do this, select "Allow editing of teams, call lists and inbound calls" in the field "Call Center Administration"

You can grant pledge editing rights to the user, allowing the user to edit pledges after lead conversion.
To do this, select "Allow editing of pledges after lead conversion" in the field "Captured Pledge Edition".

Save your changes by clicking on the top right button to create the user profile.
Editing Field Users and Agents
Please note that the Evergiving support team will not edit users on your behalf.
To edit an existing Field User or an Agent, navigate to the appropriate section - Field > Fundraisers or Campaign Managers or Call Center > Agents - click on the pencil icon on the right of the screen.

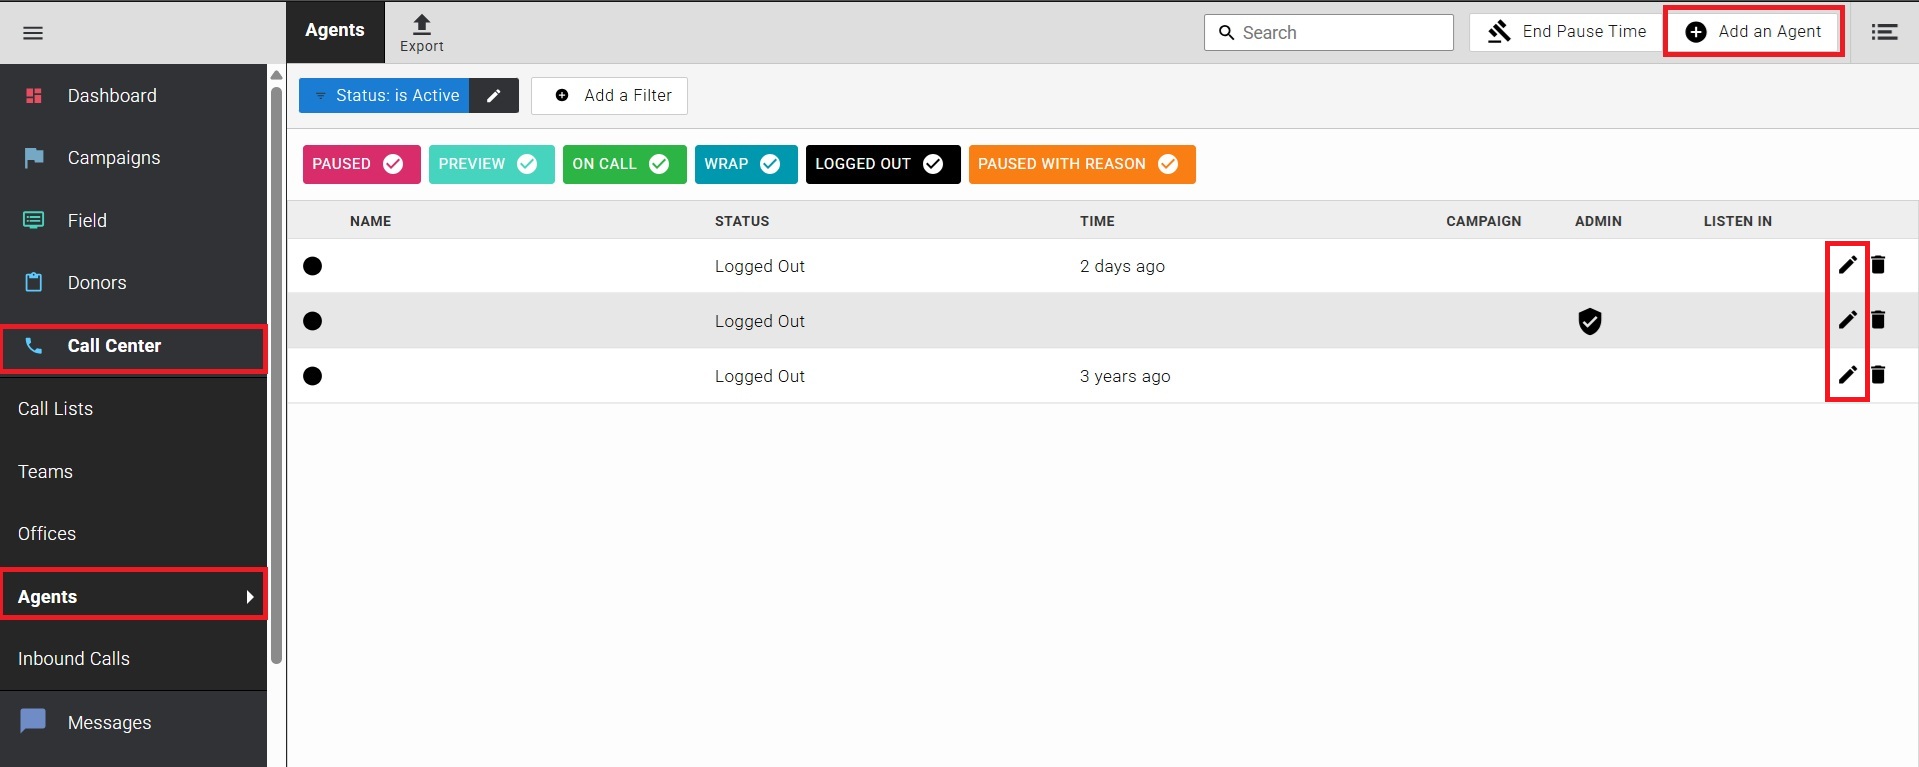
Edit the user profile as appropriate, save your changes.
Retiring Users
For GDPR, security and data management reasons, Evergiving does not delete users.
When a user no longer requires access to Evergiving, the user should be retired.
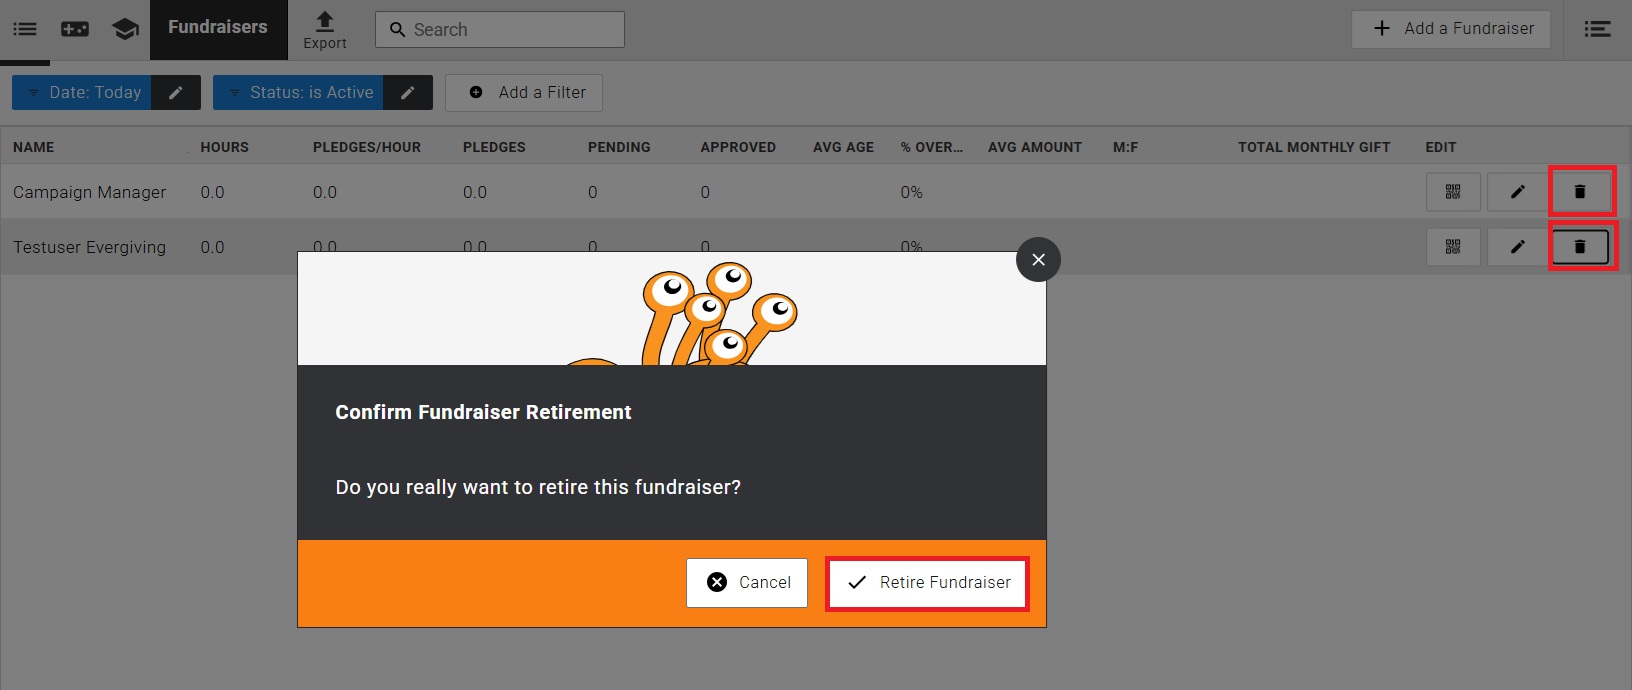
To retire a user, Admin or Field, click on the bin icon at the right of the screen.
A dialogue box will be displayed requesting confirmation that the user should be retired. Click "Retire Fundraiser", or "Deactivate User" in the case of an Admin user, or "Retire Agent" in the case of an Agent, to confirm. Click "Cancel" to cancel.
Reactivating Users
Users can be reactivated at any time.
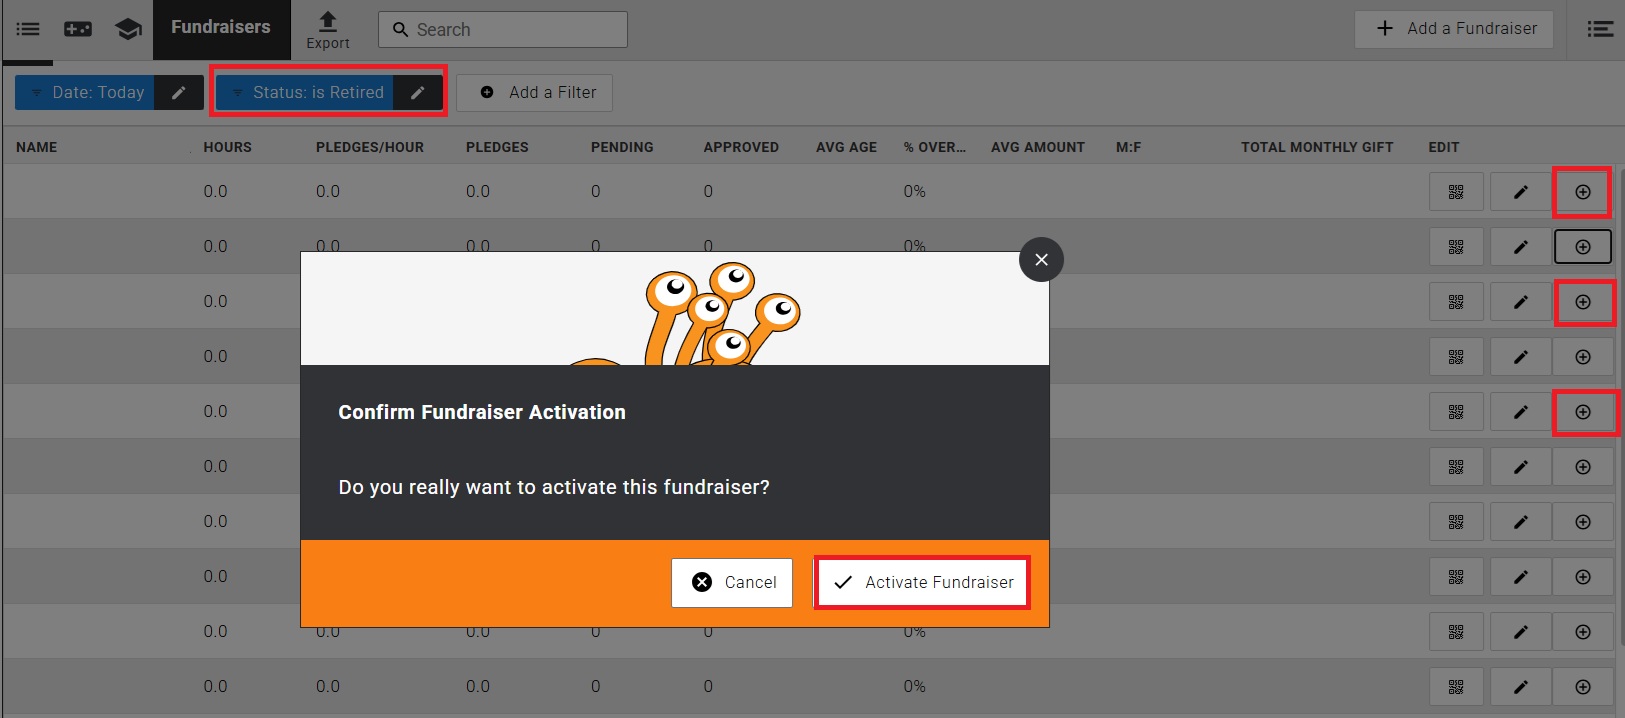
To reactivate a user, start by filtering the field user or the admin user section for "Retired" users. Use the filter at the top of the page to toggle from "Active" to "Retired".
Once the list of retired users is displayed, click on the + icon on the far right of the screen to reactivate the user.
A dialogue box will be displayed requesting confirmation that the user should be reactivated. Click on "Activate Fundraiser", or "Reactivate User" in the case of an Admin user, to confirm. Click "Cancel" to cancel.
Troubleshooting
Why can't I save the user? If the save button at the top right of the page is greyed out, one or more mandatory fields are missing. Please check that all mandatory fields are correctly filled in.
When I try to save my user, an error message is displayed "Could not add user Username: has already been taken"? Usernames must be unique, if you see this message it means the username you have used has already been taken. Please check both active and retired users.
Resources
View and download a PDF of the above instructions here.