Children Management
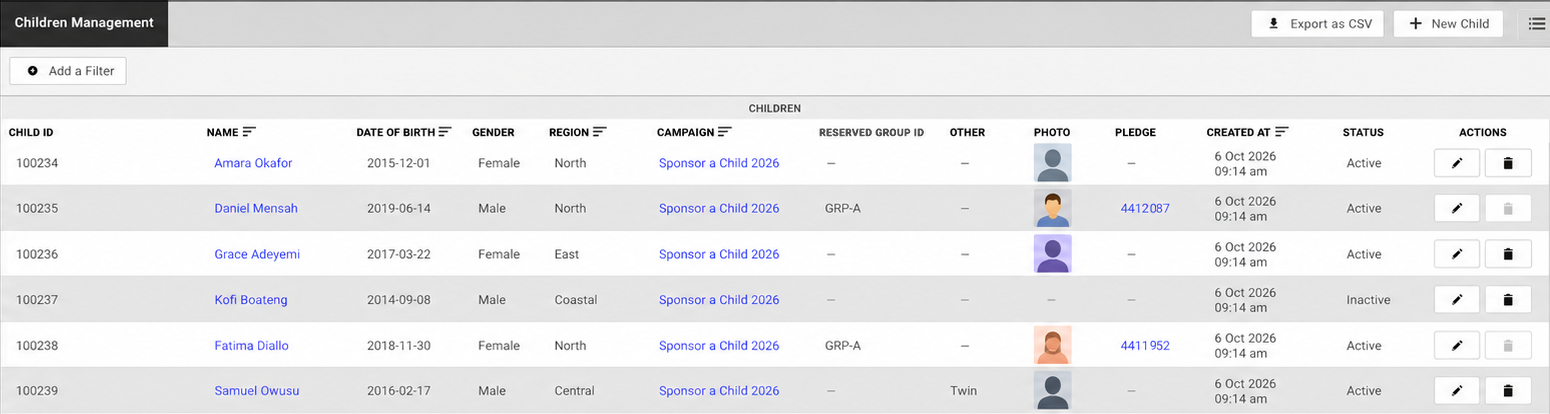
Children Management is where you keep the pool of children available for sponsorship on your campaigns. From one page you can add children individually or in bulk, upload their photos, record each child's story, see which children are already linked to a pledge, and export the list.
Overview
What is Children Management?
A child sponsorship campaign asks a donor to support one specific child. To run one, you need a list of the children who can be offered to sponsors - who they are, which campaign they belong to, what they look like and what their story is. Children Management holds that list.
Every child has a Child ID that is unique within its campaign. The Child ID is the key that everything else matches on: pledges link to it, imports are checked against it, and photo imports use it to find the right child. Every child also belongs to exactly one campaign, so that the right children are available on the right programme.
A typical programme runs like this:
- Build the pool. Add children by hand or import them from a spreadsheet, then import their photos in bulk.
- Sponsor them. When a sponsor signs up on the campaign, the pledge is linked to a child. The pledge ID appears in the child's row and the child can no longer be deleted — the sponsorship is now part of the donor's record.
- Keep it current. Edit details and photos as they change, and mark children inactive when they leave the programme.
- Report. Filter the list by campaign, region, pledge or anything else, and export it as a CSV.
Where to find it. Children in the left-hand navigation opens the Children Management page. Bulk imports of children and their photos are under Import → Import Children and Photos.
Who can use it. Access is controlled by a dedicated Children management permission on each Admin Ops user, with three levels: None, Read and Write. Full Admin Ops access are given Write access automatically; everyone else starts on None. Other user roles cannot see the section. See Permissions.
Tutorial: add your first children
This walkthrough takes about fifteen minutes. By the end you will have added a child by hand, uploaded their photo, found them with a filter, and imported the rest of your children and their photos in bulk.
You will need
- An Admin Ops login with Children management set to Write and access to Import Children (see Grant a user access to Children Management).
- A campaign already set up under Campaigns for the sponsorship programme. In this tutorial it is called Sponsor a Child 2026.
- A photo of one child, and the details of a few more children ready to type into a spreadsheet.
1. Open Children Management
Click Children in the left-hand navigation. The Children Management page opens with the Children table. If no children have been added yet, the table is empty.
2. Add one child by hand
- Click New Child in the top-right corner.
- Under Child Details, choose Sponsor a Child 2026 as the Campaign, enter
100234as the Child ID andAmara Okaforas the Name. These three fields are required — they are marked with an asterisk. - Set the Date of Birth and Gender.
- Expand Additional Details, enter
Northas the Region, and write a sentence or two in Narrative — this is the child's story.Amara loves to draw.will do for now. - Leave Active ticked and click Save Changes.
Back on the Children table, 100234 appears as a new row. The Status column shows Active, and the Pledge column shows a dash because nobody has sponsored Amara yet.
3. Upload a photo
- In Amara's row, click the pencil icon in the Actions column to open her record.
- Under Photo, click Upload Photo and choose the image file.
- Click Save Changes.
The Photo column now shows a thumbnail for 100234.
4. Find the child with a filter
- Click Add a Filter.
- Choose Child ID as the field, leave the condition as is, and start typing
1002. Matching Child IDs are suggested as you type — choose100234. - Click Apply. The table shows just one row.
- Click Close to remove the filter and show all children again.
5. Import the rest in bulk
Adding children one at a time is fine for a handful. For a whole programme, use the import.
- In a spreadsheet, create a sheet with this header row:
Child ID,Name,Date of Birth,Gender,Region,Campaign,Reserved Group ID,Other,Narrative. Using these names means the columns are matched automatically when you import — capitalisation doesn't matter. - Add one row per child. Give each child a Child ID that isn't already used on the campaign (
100235,100236and so on), enter the campaign asSponsor a Child 2026— it must match the campaign name in Evergiving exactly — and write dates of birth asDD-MM-YYYY. Leave any optional cell blank. See Import file format for every column. - Save it as a
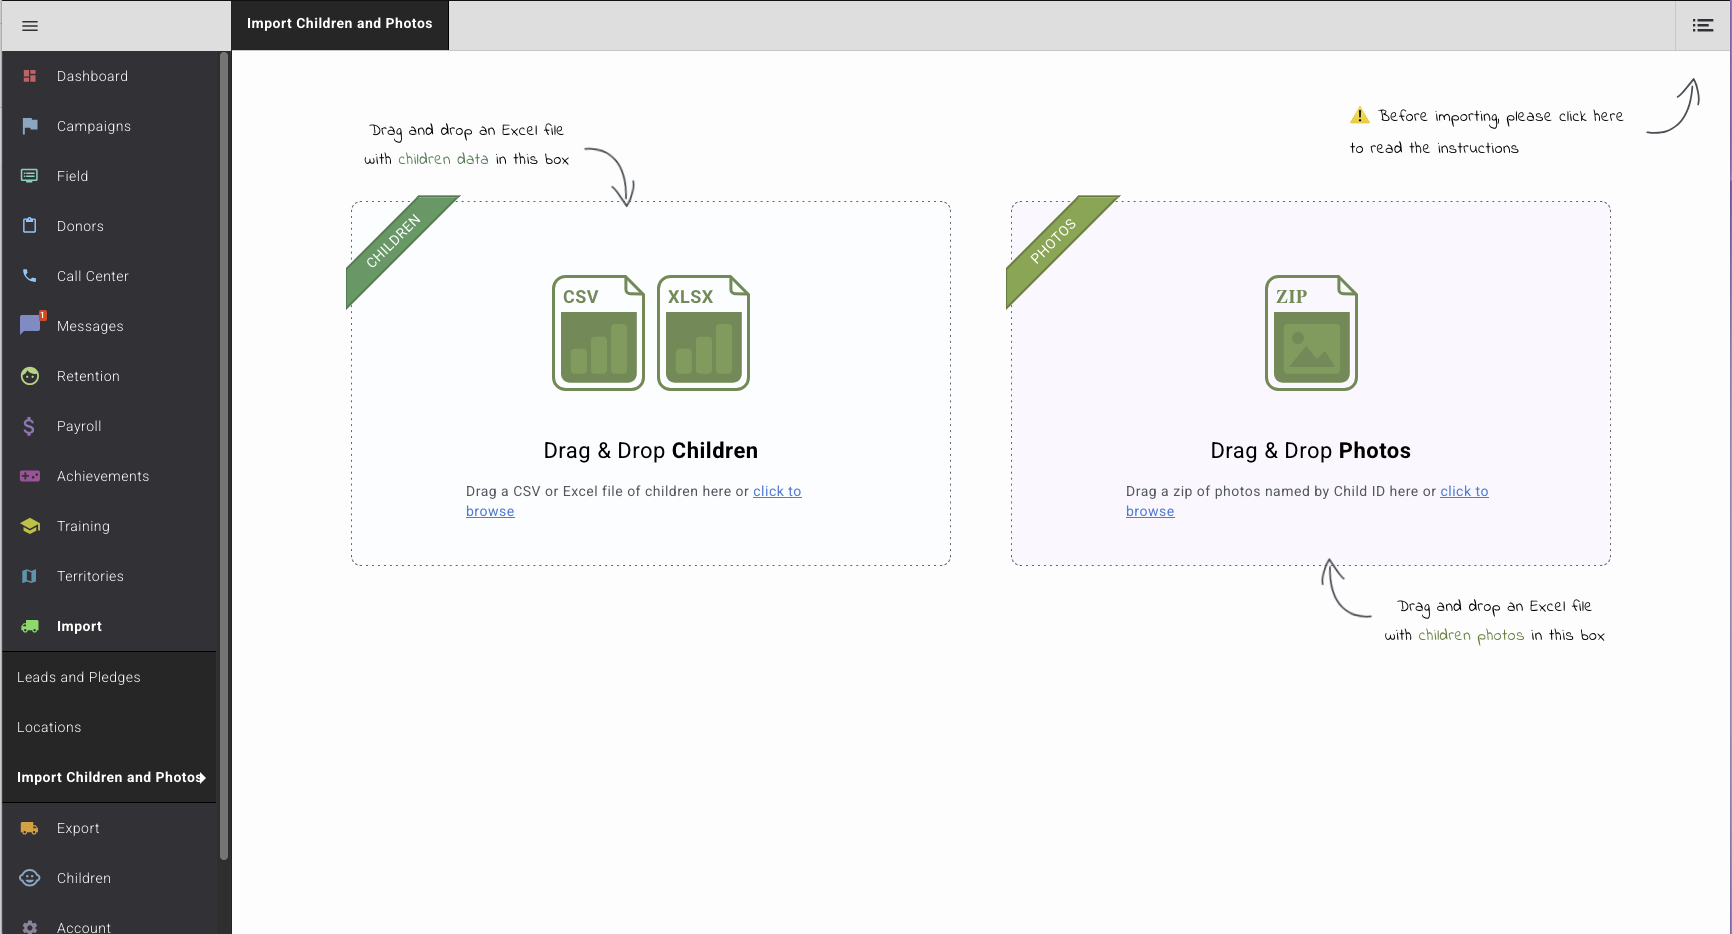
.csv,.xlsor.xlsxfile. - Go to Import → Import Children and Photos and drag the file into the Children box, or click click to browse and choose it.
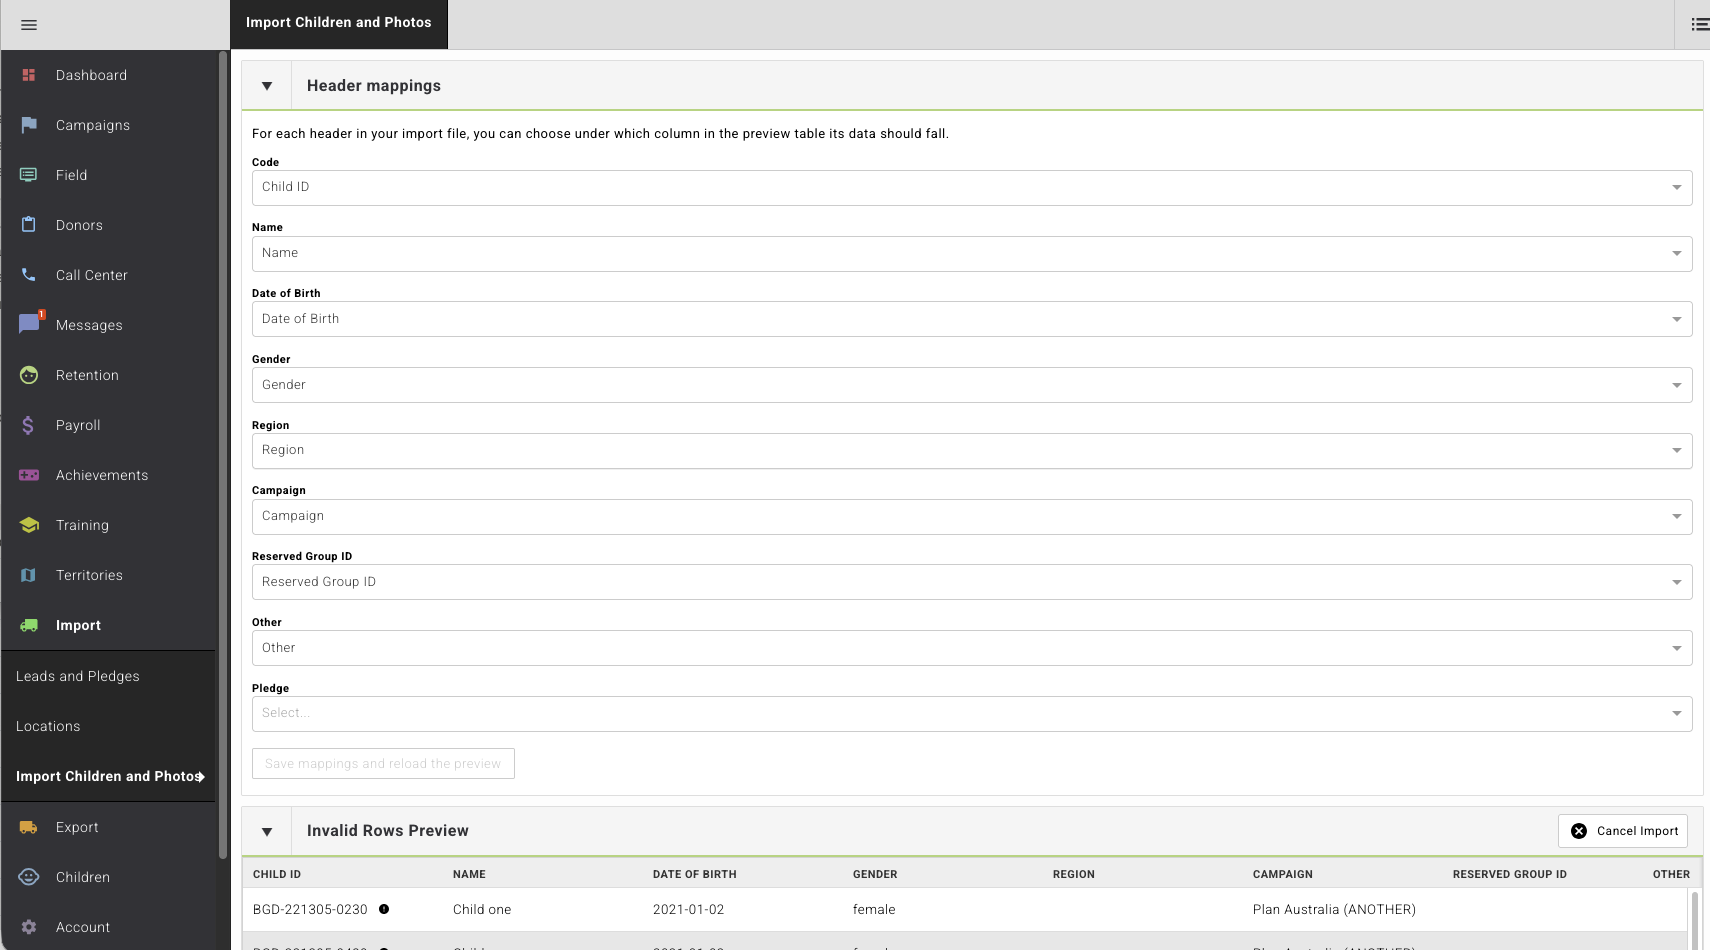
- Under Header mappings, check that each header in your file is matched to the right Evergiving column. If you used the header names above, they already are.
- Check the preview. Rows with a problem are listed under Invalid Rows Preview — hover over the ⓘ icon beside the Child ID to see what is wrong. Nothing is imported until you confirm, so if there are errors, click Cancel Import, fix the file and upload it again.
- Confirm the import. Back on the Children Management page, the new children are listed alongside Amara.
6. Import their photos
- Name each photo with the child's Child ID —
100235.jpg,100236.jpgand so on — and put them all in one folder. - Compress the folder into a
.zipfile. - Go to Import → Import Children and Photos and drag the zip file into the Photos box, or click click to browse and choose it.
The photos are processed in the background, and you receive an email when they are done. Once it arrives, every child from the import has a photo on the Children Management page. Your pool is ready: when a sponsor signs up on Sponsor a Child 2026, the child they sponsor is linked to their pledge and the pledge ID appears in the Pledge column.
How-to guides
Grant a user access to Children Management
- Go to Account → Users and open the user.
- Set Children management to Read (view and export only) or Write (add, edit and delete as well).
- Save the user.
If the user needs to import children or photos, they also need Admin Operations permissions with access to Import Children, set alongside your other import permissions.
Add a child
- Go to Children and click New Child.
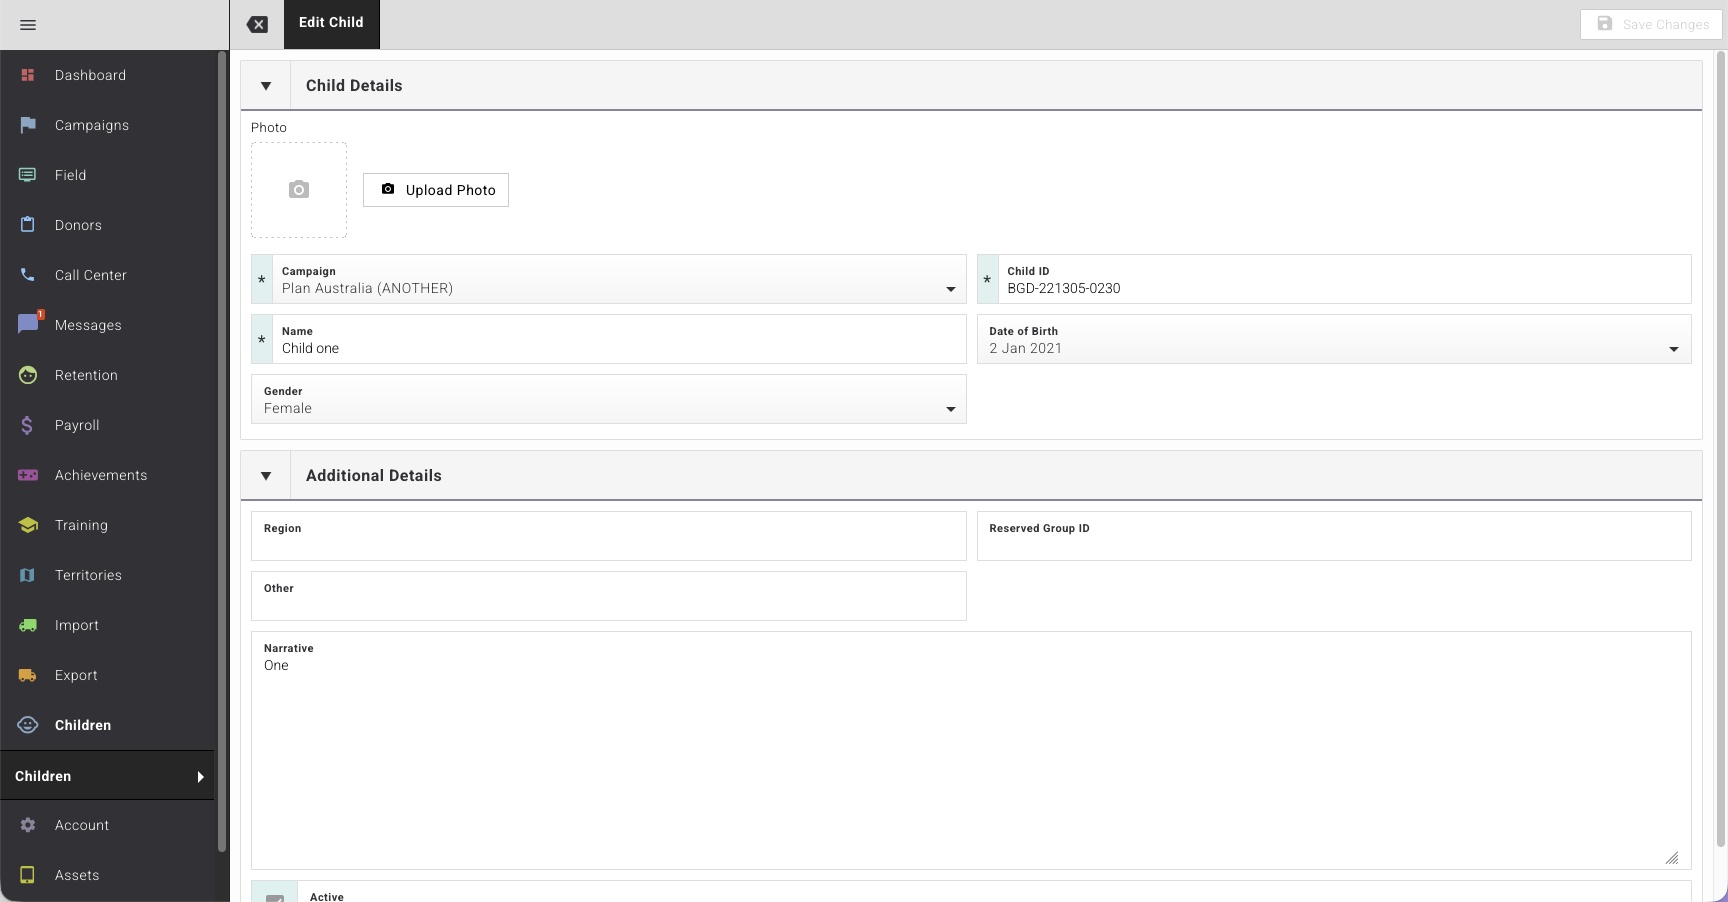
- Under Child Details, choose the Campaign and enter a Child ID and Name — all three are required. The Child ID must not already be in use on that campaign.
- Add the Date of Birth and Gender if you have them, and click Upload Photo to add a picture.
- Expand Additional Details to add a Region, Reserved Group ID, Other and the child's Narrative.
- Click Save Changes.
Edit a child
- On the Children Management page, click the pencil icon in the Actions column, or click the child's name.
- Change any field. Save Changes becomes available once something has changed.
- Click Save Changes, or click the close button beside the page title to leave without saving.
Add or replace a child's photo
- Open the child's record (see Edit a child).
- Under Photo, click Upload Photo and choose the image. The new picture replaces the old one.
- Click Save Changes.
To add photos for many children at once, see Import children's photos in bulk.
Mark a child as inactive
Use this when a child's record should be kept but the child should no longer be treated as available — for example when they have left the programme.
- Open the child's record.
- Under Additional Details, untick Active.
- Click Save Changes. The child's Status on the Children Management page changes to Inactive.
Tick Active again to make the child available.
Delete a child
- On the Children Management page, click the bin icon in the child's Actions column.
- In the Confirm Deletion dialog, click Delete Child.
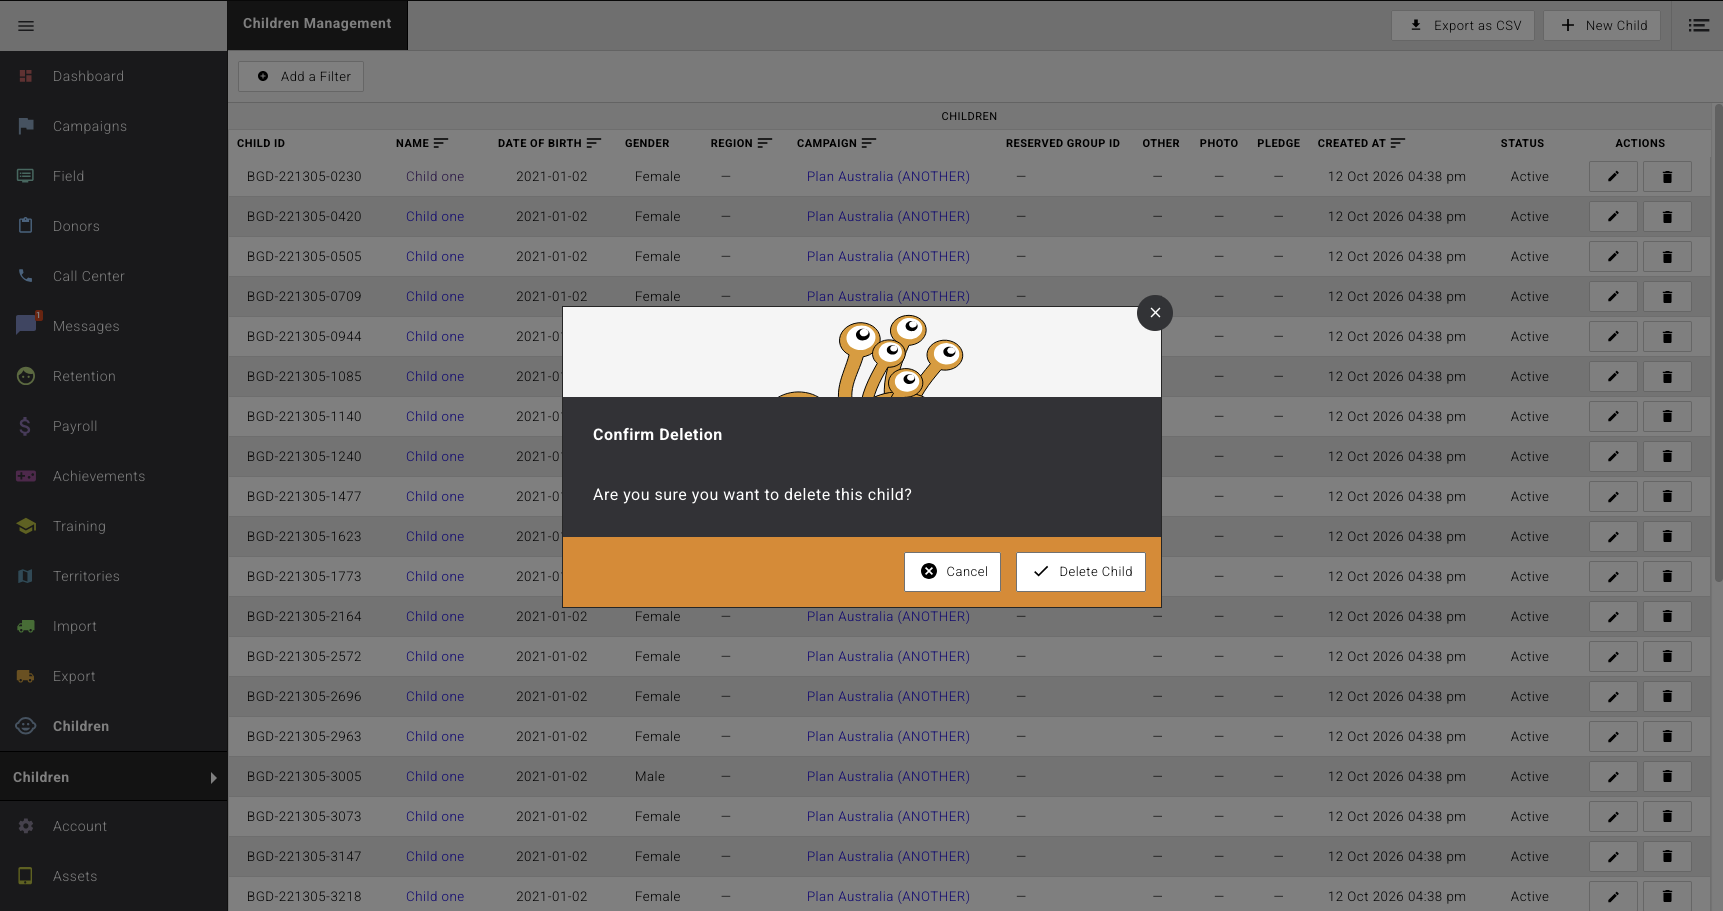
A child who is linked to a pledge cannot be deleted. Their bin icon is greyed out, and hovering over it explains why. Mark the child as inactive instead if they should no longer be offered to sponsors.
Find children
Filter. Click Add a Filter, choose a field, a condition and a value, and click Apply. Click the + button to add another condition before applying. Campaign, Child ID and Name suggest matching values as you type, and the Campaign list is pre-filled with the campaigns in your account. Date of Birth can be filtered by a range of dates. Click Close to remove the filter.
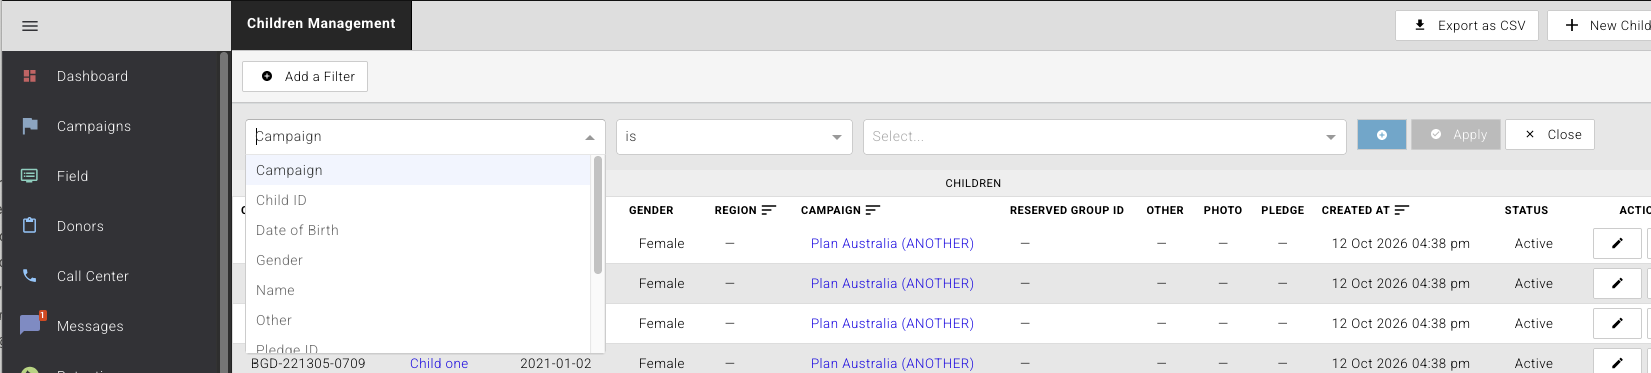
Sort. Click the heading of the Name, Date of Birth, Region, Campaign or Created At column to sort by it.
Scroll. The table loads more children as you scroll down — there are no pages to click through.
Jump to related records. Click a campaign name to open the campaign, or a pledge ID in the Pledge column to open the pledge.
Export children as CSV
- If you only want some of the children, apply a filter first — the export contains exactly what the table is showing.
- Click Export as CSV in the top-right corner. The file downloads to your computer.
Import children in bulk
Imports create children; they don't update them. To change a child who already exists, edit the record on the Children Management page.
- Prepare a
.csv,.xlsor.xlsxfile with the columns listed in Import file format. The first row must contain the column headings. Only Child ID, Name and Campaign must have a value in every row; the other columns can be blank. - Go to Import → Import Children and Photos. The list icon in the top-right corner of the page opens the import instructions if you want to check them first.
-
Drag your file into the Children box, or click click to browse and choose it.
-
Under Header mappings, check how each header in your file has been matched to Evergiving's columns. Headers that match an Evergiving column name are mapped automatically — capitalisation doesn't matter, and
Codeis accepted for Child ID. Choose a column for any that aren't, and click Save mappings and reload the preview. -
Review the preview. Rows with errors are listed under Invalid Rows Preview; hover over the ⓘ icon beside the Child ID to see why. A row has an error if a required value is missing, the Child ID already exists on that campaign or appears twice in the file, the campaign name doesn't match a campaign in your account, or a date or gender is in the wrong format.
-
Nothing is imported until you confirm. Rows with errors are not imported, so either click Cancel Import, fix the file and upload it again, or confirm the import and add the children from the error rows separately.
Import children's photos in bulk
- Name each image file with the child's Child ID, for example
100234.jpg. - Put the images in one folder and compress it into a
.zipfile. - Go to Import → Import Children and Photos and drag the zip file into the Photos box, or click click to browse and choose it.
The photos are processed in the background, and you receive an email when the import is done. Each image is attached to the child whose Child ID matches the file name, replacing any photo that child already had. Children must already exist in Evergiving before their photos can be imported — import the spreadsheet first.
Reference
The Children table
| Column | What it shows | Sortable |
|---|---|---|
| Child ID | The child's unique identifier | — |
| Name | The child's name; click it to open the record | Yes |
| Date of Birth | Shown as YYYY-MM-DD |
Yes |
| Gender | Male, Female or Other | — |
| Region | The region recorded for the child | Yes |
| Campaign | The campaign the child belongs to; click it to open the campaign | Yes |
| Reserved Group ID | The reserved group recorded for the child, if any | — |
| Other | The free-text Other field | — |
| Photo | A thumbnail, if a photo has been uploaded | — |
| Pledge | The ID of the pledge the child is linked to, if sponsored; click it to open the pledge | — |
| Created At | When the record was created in Evergiving | Yes |
| Status | Active or Inactive | — |
| Actions | Edit (pencil) and Delete (bin) | — |
A dash (—) means the field is empty.
Child record fields
The New Child and Edit Child pages have two sections.
Child Details
| Field | Required | Notes |
|---|---|---|
| Photo | No | Click Upload Photo to add or replace it |
| Campaign | Yes | Chosen from the campaigns in your account |
| Child ID | Yes | Must not already be in use on the campaign |
| Name | Yes | |
| Date of Birth | No | Chosen from a date picker |
| Gender | No | Male, Female or Other |
Additional Details
| Field | Required | Notes |
|---|---|---|
| Region | No | Free text, such as a province or district |
| Reserved Group ID | No | Free text; use it to group children set aside for a particular purpose |
| Other | No | Free text for anything else you want to record and filter on |
| Narrative | No | Multi-line text — the child's story |
| Active | — | Ticked by default; untick to mark the child inactive |
Filters
| Filter | Notes |
|---|---|
| Campaign | Choose from the campaigns in your account; suggests as you type |
| Child ID | Suggests matching IDs as you type |
| Date of Birth | Filter by a range of dates |
| Gender | Male, Female or Other |
| Name | Suggests matching names as you type |
| Other | Matches the Other field |
| Pledge ID | Find the child linked to a particular pledge |
| Region | Matches the Region field |
| Reserved Group ID | Matches the Reserved Group ID field |
Import file format
A .csv, .xls or .xlsx file. The first row must contain the column headings; they are not case sensitive. Headers that match the names below are mapped automatically, and any others can be matched on the Header mappings step. Files with more than 100,000 rows are rejected — smaller files are recommended.
| Column | Required | Format |
|---|---|---|
Child ID |
Yes | The child's unique code, e.g. 100234 or BGD-221305-0230. Must not already exist on the campaign. Code is also accepted as the heading |
Name |
Yes | |
Date of Birth |
No | DD-MM-YYYY, e.g. 01-12-2015 |
Gender |
No | Male, Female or Other |
Region |
No | Free text |
Campaign |
Yes | Must match the campaign name in Evergiving exactly |
Reserved Group ID |
No | Free text |
Other |
No | Free text |
Narrative |
No | Free text |
Example:
Child ID,Name,Date of Birth,Gender,Region,Campaign,Reserved Group ID,Other,Narrative
100234,Amara Okafor,01-12-2015,Female,North,Sponsor a Child 2026,,,Amara loves to draw.
100235,Daniel Mensah,14-06-2019,Male,North,Sponsor a Child 2026,GRP-A,,Daniel wants to be a teacher.
Photo import format
A .zip archive of photos, each file named with the child's Child ID — 100234.jpg, for example. Photos are processed in the background, and you receive an email when the import is done. The children must already exist in Evergiving.
Permissions
Children management is set per Admin Ops user under Account → Users.
| Level | What the user can do |
|---|---|
| None | Cannot see the Children section |
| Read | Open the Children Management page; view child records; filter, sort and export |
| Write | Everything in Read, plus add, edit and delete children and upload photos |
Importing children and photos needs Admin Operations permissions with access to Import Children, set alongside your other import permissions — the Children management permission on its own doesn't cover it. Users with full Admin Ops access to all sections have Write access to Children Management; they were granted it automatically when the feature was released.
Quick reference
| Action | Where |
|---|---|
| View and manage children | Children → Children Management |
| Add a child | Children Management → New Child |
| Edit a child | Children Management → pencil icon in Actions |
| Delete a child | Children Management → bin icon in Actions |
| Filter and sort | Children Management → Add a Filter; column headings |
| Export | Children Management → Export as CSV |
| Import children (CSV or Excel) | Import → Import Children and Photos |
| Import photos (ZIP) | Import → Import Children and Photos |
| Set who can access | Account → Users → Children management |
Good to know
- Child IDs are the key to everything. Pledges, spreadsheet imports and photo imports all match on the Child ID, which is why it is required. A Child ID has to be unique within its campaign, and we recommend keeping IDs unique across your whole account too, because photo files are matched by Child ID alone. Agree a format with your programme team before you start importing — for example a country or project prefix followed by a number — and stick to it.
- Imports create, they don't update. A Child ID that already exists on the same campaign, or appears twice in the file, is reported as an error in the preview and skipped. To change an existing child, edit the record.
- Headers can be mapped; values can't. If your file's headers don't match Evergiving's column names, you can match them on the Header mappings step. The values in each row still have to be in the expected format — the mapping doesn't convert dates or genders for you.
- Campaign names must match exactly. When importing, the
Campaigncolumn is matched against your campaign names in Evergiving, including spaces and capitalisation. If an import row is invalid, this is the first thing to check. - Sponsored children are protected. Once a child is linked to a pledge, the link is part of the donor's record, so the child can't be deleted. If a sponsored child leaves the programme, mark them inactive and handle the change with the donor through your usual process.
- Dates appear in different formats in different places. The Children table shows dates of birth as
YYYY-MM-DD, the child record shows them as2 Jan 2021, and the import file expectsDD-MM-YYYY. - Exports respect your filters. To export one campaign's children, filter by campaign first.
- Children are account-wide. The Children Management page lists every child in your account across all campaigns. Filter by Campaign to see one programme.
Questions about Children Management? Contact support@evergiving.com